

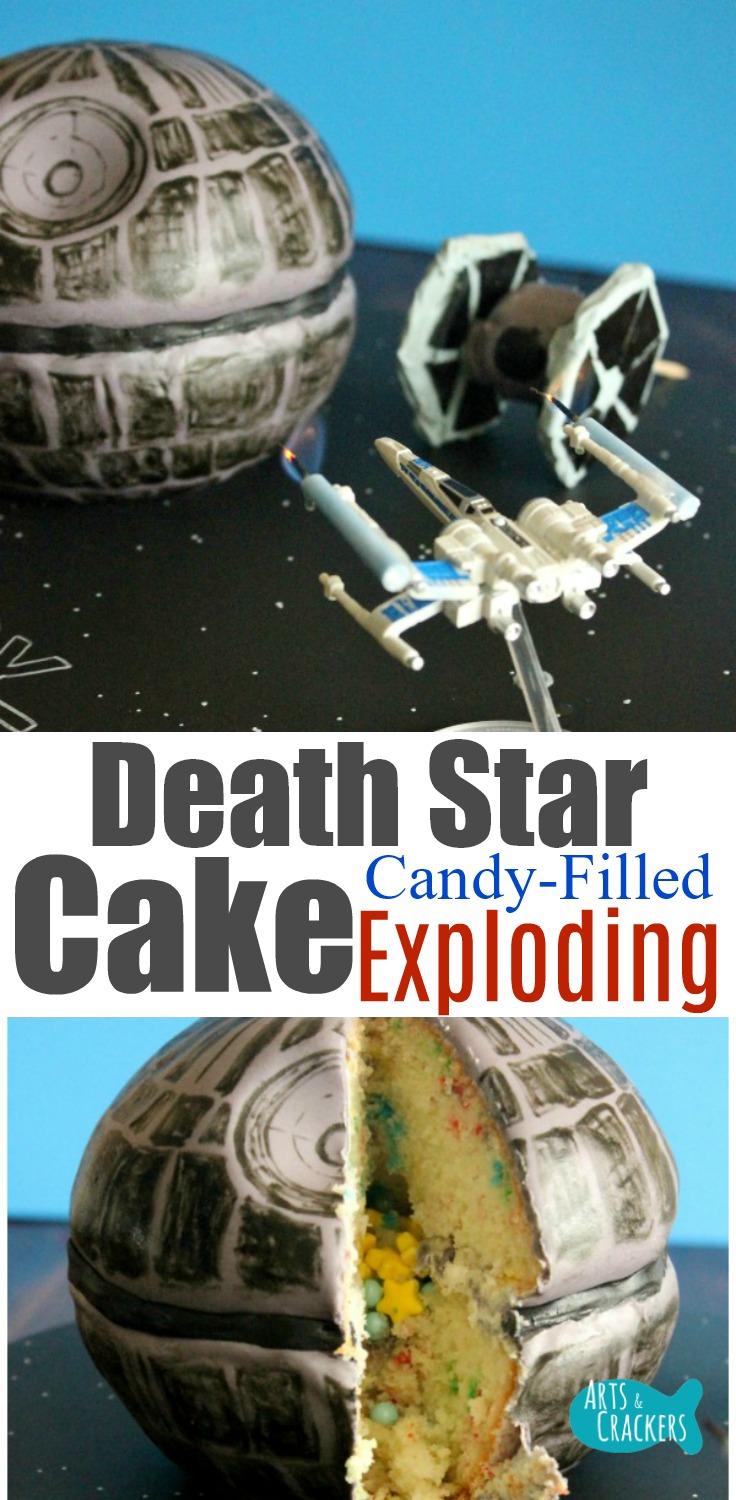
If you were to walk into my house any given day, at any given time, I can almost guarantee you there would be one topic that would make its way into our discussion…Star Wars. My oldest son, E, is most obsessed with it out of all of us, so when his birthday rolled around, I knew just what type of cake I wanted to make for him–a Candy-Filled Death Star Cake with Tie Fighter Cake Pops–and I am going to share with you how I made it (it is easier than it seems!).

This post contains affiliate links. By purchasing through these links, you help support the family behind Arts & Crackers at no added cost to you! Thank you!
The shape of Tie Fighters has always screamed “Cake Pops” to me, so I have been wanting to make these for a while, but the idea for a 3D Death Star Cake was something I came up with more recently. I was trying to think of a way to make E’s birthday more special because we recently moved and didn’t know a lot of people and weren’t in any shape for throwing a party, since we are still getting settled, so instead I wanted to put time into a special Star Wars Cake I knew he would flip over.
You’ll love our Star Wars Birthday Party ideas!
When I decided to finally make this Death Star Cake, I was so excited shopping for the ingredients and even making it. It really is as simple as I pictured (the Tie Fighter Cake Pops not quite so much, but they are doable in small numbers).

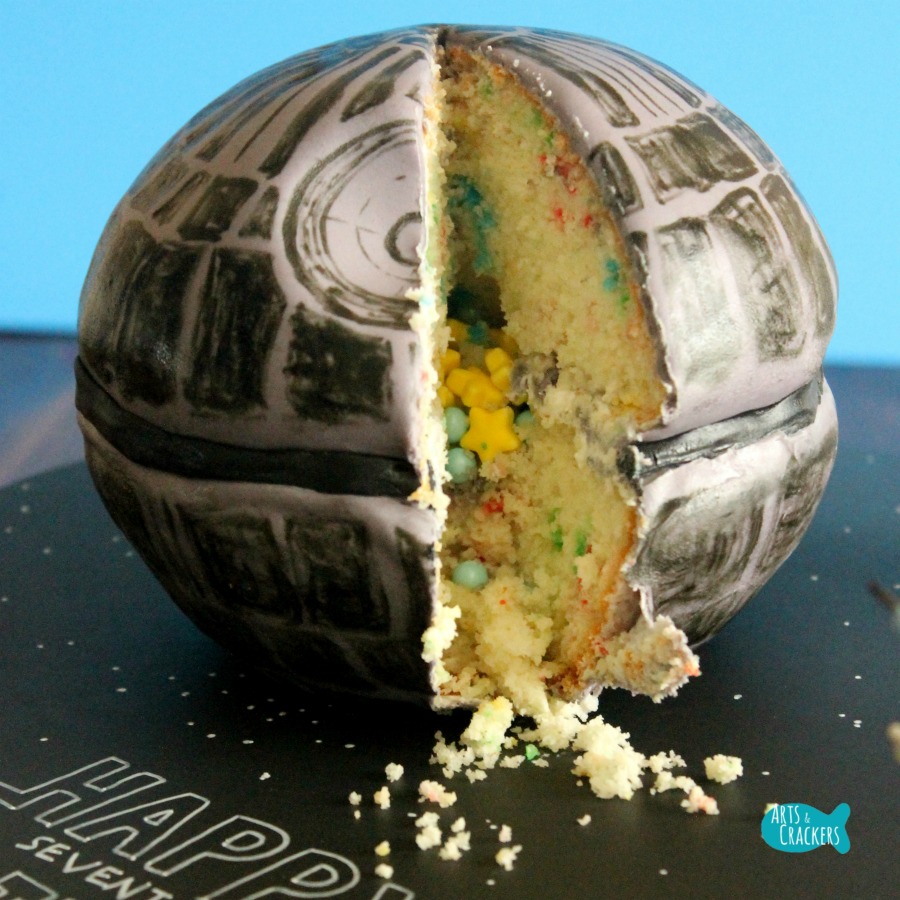
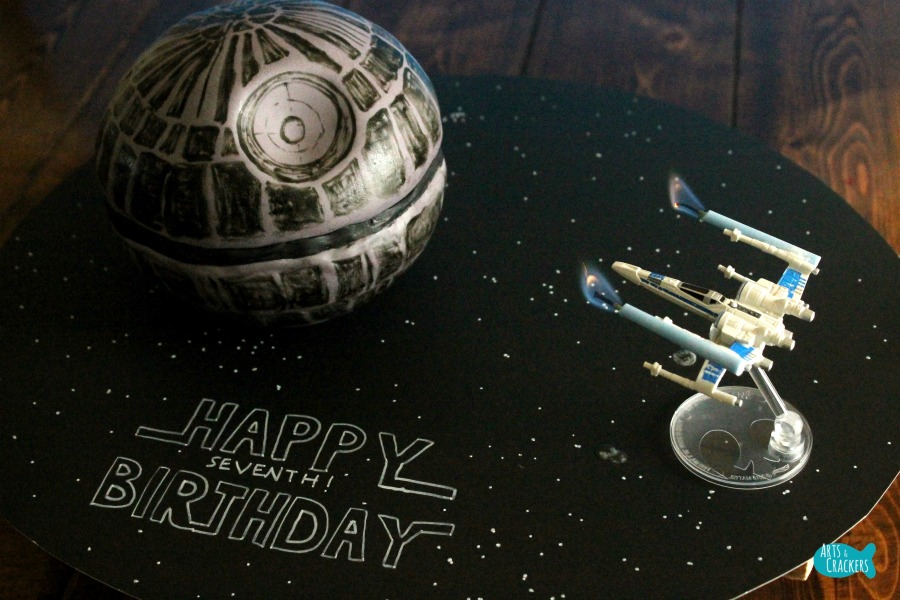
E has always loved the idea of candy spilling out of cake, so we went all out with sugar on this one and made a candy-filled cake. The full cake and candle creates a scene–a scene of the Death Star blowing up/being defeated. We didn’t want it too gory, so I refrained from anything red or anything inside, but we filled the cake with stars and sparkly sprinkles that “explode” out when the cake is cut into and the Dark Side is [temporarily] defeated.
You can totally make this yourself, so here goes. If you do not wish to make the Tie Fighter Pops or special cake stand, just skip over those steps. I will be including everything as I did it while creating what you see pictured.
Candy-Filled Death Star Cake Decorating Tutorial with Tie Fighter Cake Pops
What you need:
Directions
Begin by making the cake. Follow the cake recipe instructions for preparing the mix and the pan instructions beyond this. You will end up with two half circles. Let these cool before moving on.
PS, have you seen our Chewbacca Cupcakes and Yoda Cupcakes?! You have to check them out!


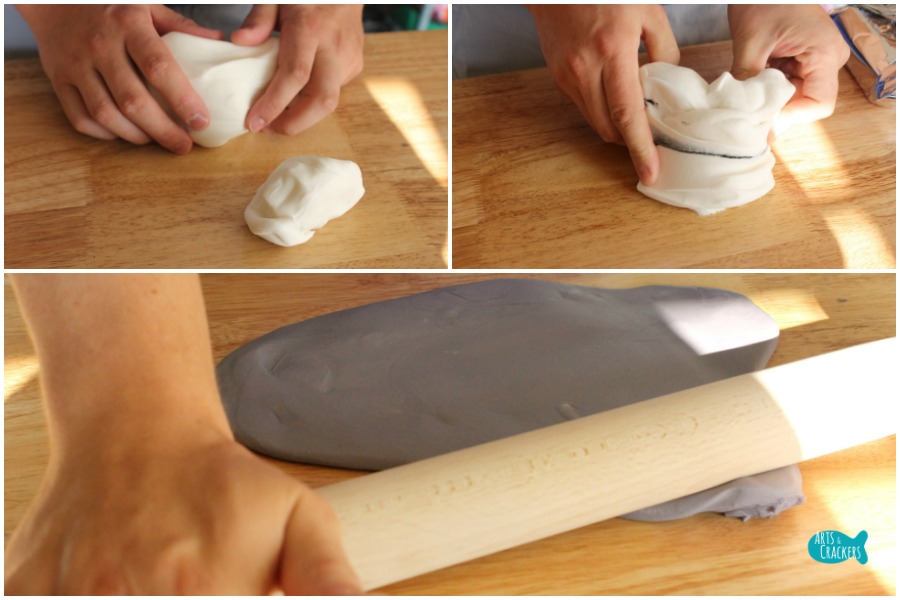
Prepare the fondant by kneading a small amount of black fondant into the white fondant. We used all of the white fondant in the container, but have a lot of black left. This way we have black fondant for steps further on, a nice gray color, and enough fondant to cover the entire cake and some cake pops. Once the fondant is fully blended into a gray color, set aside (you can place this in a baggie if needed to keep it from drying out, but this shouldn’t be necessary unless you are making the cake over a couple days.). We rolled ours out right away. Make sure it is a nice, big, thin sheet of fondant.
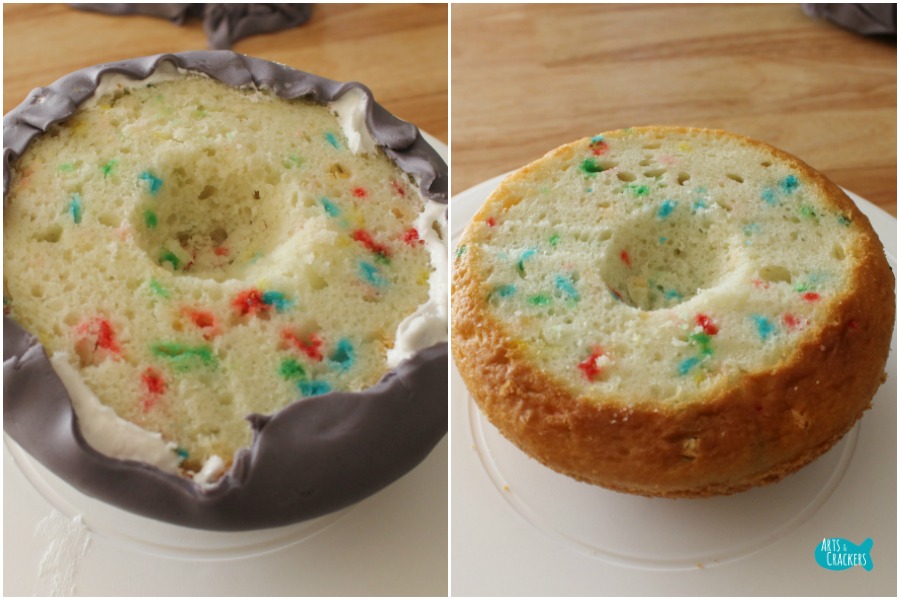
When the cake mix baked, it likely rose. Using a cake level or a sharp bread knife, level out the cake by cutting off the top (the part that rose up/what would be the center of the circle), then set this extra cake aside as we will use it later.

Before moving on with your Death Star Cake, it is a good idea to begin on the Tie Fighter Cake Pops if you are making them, so the chocolate has time to harden. Using a sharp knife, carefully cut a graham cracker in half. Gently trim the edges to turn it into an elongated hexagon. You will need two of these for each Tie Fighter Cake Pop you decide to make. Melt and dye your white chocolate chips gray using the black food coloring (or just melt your Black and White Candy Melts mixture to make gray–about the same ratio as the fondant above.). While the chocolate is melted and smooth, place a graham cracker inside, flip it over, and make sure the entire thing is coated. Remove using a fork, then place on a piece of wax paper to harden. Do this for as many Tie Fighter Cake Pops as you wish to make.

Back to the Death Star Cake. Place one half-circle cake onto a surface (I used a spinning cake stand because it makes things so much easier) then use a frosting knife to spread a thin layer of frosting over the entire cake. Gently lay your thin sheet of rolled-out fondant over the cake, smooth down the sides, and trim off the excess. Smooth over one more time (use a fondant smoother for a nice, consistent look–I did not have one so mine ended up a little lumpy) then carefully flip the cake over, add a small amount of frosting around the edges, and fold the fondant over around the edges.

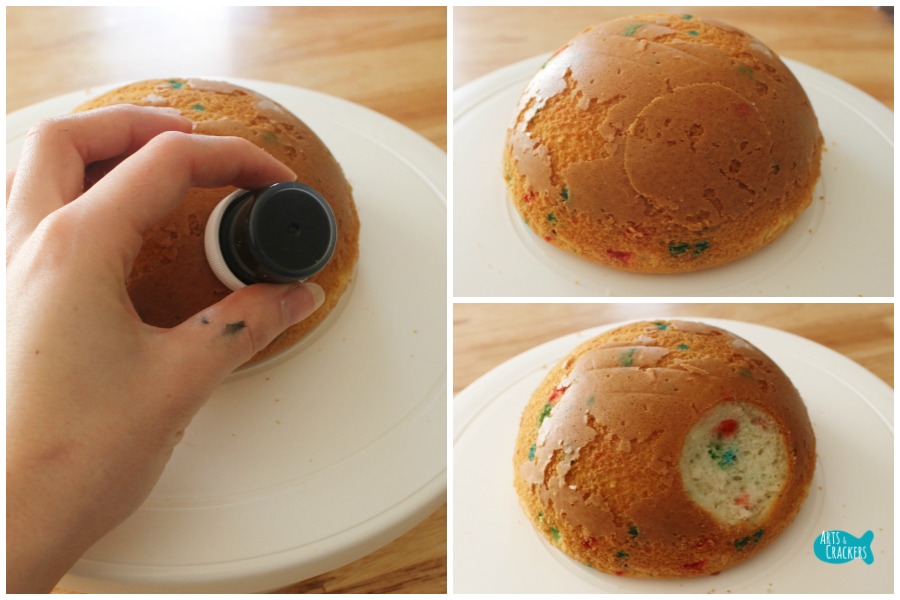
Take both halves of the cake and, using a sharp knife or a spoon, remove part of the very center of the cake and set the extras aside. This is where we will hide the candy. Set the fondant-covered cake aside in the refrigerator until a little later. You will want to place it upside down with the cake part down if you want to keep the round shape throughout, otherwise the fondant will harden with a smooth, flat spot on the bottom.
Now for the top of the cake. Using the cap from the gel food coloring as a guide (or use something similar size), make a cut mark about a half-inch out all the way around the cap. Holding the knife at an angle, cut into the center of the circle you made, all the way around, to remove a small top layer. Do not scoop this like you did where the candy will go. This is a gentle “divot” in the cake.
Roll out more gray fondant into a large, thin sheet. Add a layer of frosting to this half of the cake, lay the fondant over it, smooth out (pay extra attention to that spot you cut out on the top), then trim off the excess. Place this layer in the refrigerator briefly to harden and pull out the bottom piece that has been in there a while. Using the edible ink marker, draw on the geometric pattern the Death Star has. I referenced pictures online to make sure it looked fairly accurate and used an uneven crosshatch pattern to give the drawn-on blocks a textured look. Do this all the way around the fondant then remove the top piece from the refrigerator and do the same for that (the circle piece you cut out looks a little different, so I recommend drawing that part first, based off of pictures online.). Place back in the refrigerator for a little bit.

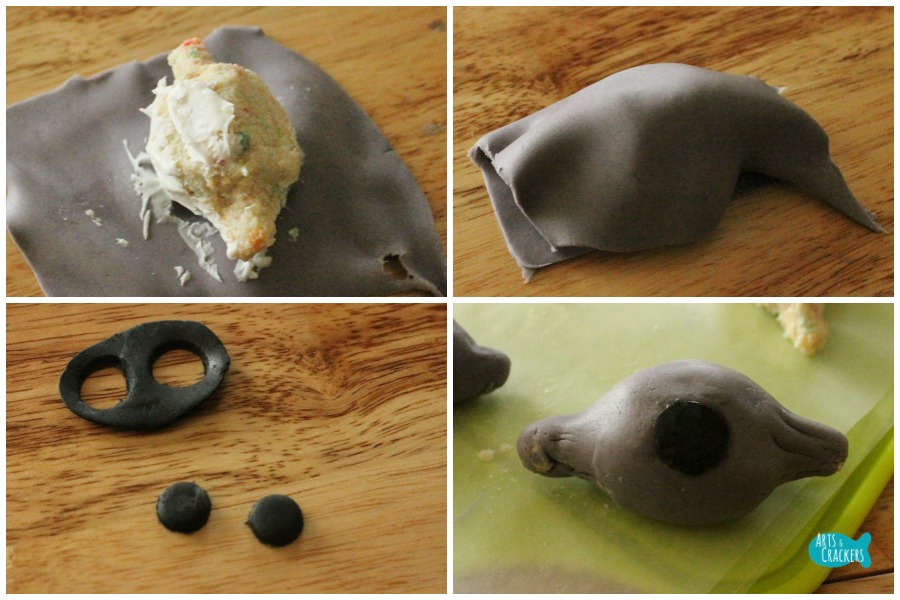
While the cakes are in the refrigerator, take some of that leftover cake and turn it into crumbs. Add a little frosting and mix it up until you can form it into sticky ball shapes, like a dough. Shape some Tie Fighters. I tried this two different ways–regular sphere shapes and spheres with “arms” like Tie Fighters have. The way with arms won out. Once you have formed these, place them on a board covered in wax paper and place them in the refrigerator for at least 30 minutes (or the freezer to get things moving faster) until they are firm.

Pull the bottom half of the cake back out of the refrigerator. Fill the center with candy until it is heaping over just a little.
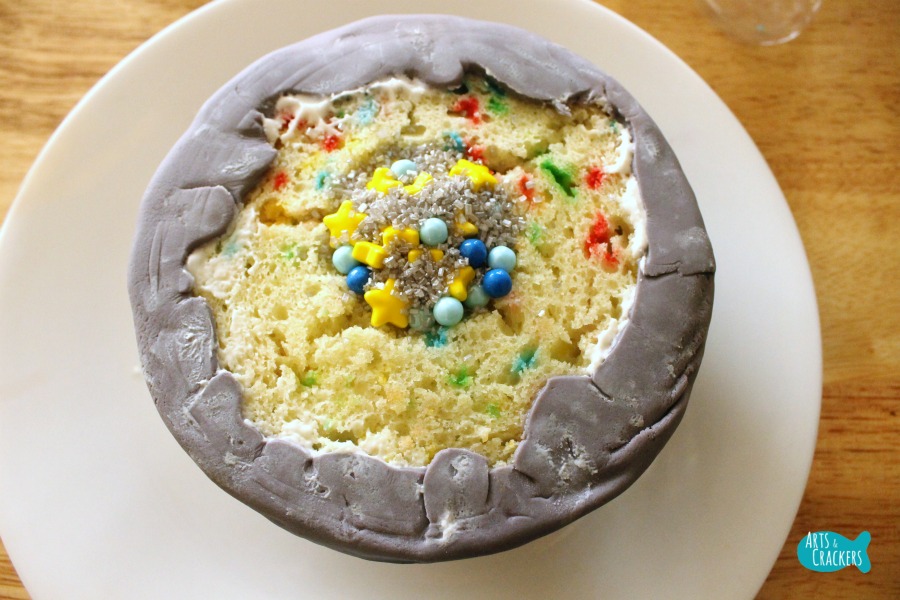
Add a layer of frosting all around the cake, avoiding the candy center. Carefully place the top half circle on top of the bottom to create a full sphere Death Star Cake. Press down lightly so the two halves stick together and make sure it is lined up to where you want it. Roll out a piece of black fondant to make a thin black rope and gently press it around the gap between the cakes. Smooth it out the best you can. Place the cake back in the refrigerator as you move onto the next step.

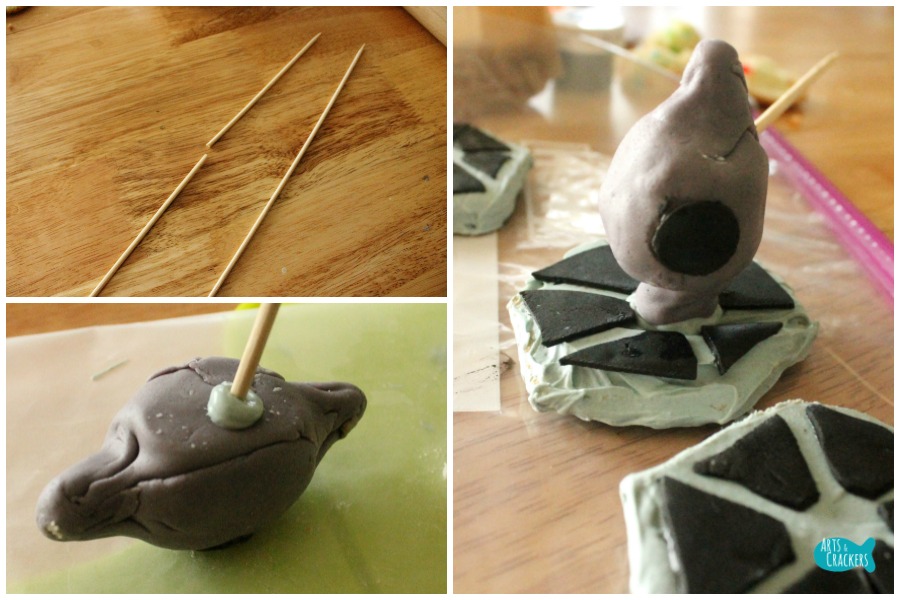
If you are not making the Tie Fighter Cake Pops, you can skip this step too. If you are, place the hardened chocolate-covered graham crackers on a piece of rolled-out black fondant. Using a sharp knife, carefully cut around the graham crackers, using them as a template. Remove the graham cracker and finish cutting trapezoids–six of these, leaving some space between each and around the outside and in the center. Carefully remove the trapezoid pieces of fondant, add a tiny bit of water to the back, and gently press them around the graham crackers. You will do this on both sides of the graham crackers.

Roll out another thin piece of gray fondant.** Remove the Tie Fighter Cake Pop bases from the refrigerator and place them on the rolled-out fondant. Trim around each so there is enough fondant to cover them. add a small amount of frosting on one part then carefully roll the fondant over and smooth out around the cake balls, removing excess fondant, until everything is covered and as smooth as you can get it. Roll out a tiny bit of black fondant then, using the cap from the edible ink pen, cut out circles to place on the Tie Fighters. Gently flatten these circles just slightly to make them smooth and round, add a tiny dab of water on the back, then place them on the Tie Fighter Cake Pops, one on each in the middle. Place these back in the refrigerator or freezer so the fondant can harden.
My Death Star Pizza and String Cheese Storm Troopers are a perfect meal and snack to serve at your party!
**Note: if you have enough gray chocolate, I recommend just dipping the cake pops in that rather than using gray fondant. Unfortunately, I had very little chocolate left in my house, so I made do with what I had, but next time I would coat in chocolate because it is a bit sturdier and simpler to work with.
Make your Candy-Filled Death Star Cake look even more amazing by creating this simple and fun cake stand for it. Place one half of the round cake pan you used onto a rectangular piece of wood on one end and mark where you want the Death Star Cake to sit. Place the piece of wood on a piece of black poster board and draw a large circle or oval shape around it, making sure it will cover the wood piece once it is cut out. Cut the circle/oval out. Place a long, clean screw in the block of wood where you want the cake to sit. My husband counter-sunk it in at the bottom so the wood would sit completely flat and more of the screw would come through. Poke a hole through the poster board so it sits nicely on top of the wood with the screw sticking through and no wood showing beneath. Wipe the screw off so it is clean. Using a white paint pen, add clusters of dots of various sizes all around to make it look like stars. If you wish, you can write “Happy Birthday” or anything else on the board as well at the front of it. Let the paint dry fully before placing the cake on the stand.

Finish up the Tie Fighter Cake Pops. Melt more gray-colored chocolate. Cut a bamboo skewer in half, dip the flatter end in the melted chocolate, then place into the cake ball somewhere other than the ends or where the black dot is. Grab the cake pop by the actual cake part (not the skewer) and dip one arm in chocolate then place onto one of the Tie Fighter wings you made from graham cracker. Hold it for a little bit so it begins to harden, then place in the freezer for a few minutes until it hardens. Remove from the freezer and very carefully flip the cake pop over and do the same for the other side, making sure the wings match up, and very carefully place back in the freezer. This part is very challenging, so do not rush it or you will have a mess. We only ended up with one halfway decent one because we got a little distracted and held it in place a little too firmly…smush. Oops!
Did you know I have Star Wars Printables available?
Remove the cake from the refrigerator and carefully slide on to the screw sticking out of your beautiful cake stand. Place the toy Tie Fighter on its stand and hot glue one candle on either top “gun” on the Tie Fighter. Make sure the candles stick out a ways so they have time to burn before the toy itself burns.

Mom fail moment…the blogger in me had to get more pictures, so I re-lit the candles not realizing how little space was left before it got to the toy…so… E was watching as I did this and started shouting at me thinking I was crazy for doing this and pointing out that the toy was indeed on fire. Thankfully we caught it quickly and now he has a funny reminder of this birthday, but please do be careful that you have enough candle space and do not let it burn too long so you don’t end up with an X-Wing up in flames.

Place the Tie Fighter across from the Death Star so it looks like it is shooting at it.

This cake was so much fun to make, serve, and eat. It would be perfect for a small gathering. If you want more cake to serve for a larger party, I recommend doing a sheet cake on the bottom in place of the wood and paper stand. Just cover with black fondant and add specks of edible white coloring. If you want the Death Star Cake to still stand in place, add some melted chocolate to the end of a skewer or lollipop stick and place it into the sheet cake where you want the ball, let it harden, then place the round Death Star Cake on that.

Serve with or without the Tie Fighter Cake Pops. If you made enough that you are proud of and are serving on top of a sheet cake, you can stick these into the cake so it looks like they are flying around.

It’s safe to say E loved his cake!

View all my Star Wars Posts


Read also: Starship Printable Board Game and R2-D2 Printable Juice Box Covers


What an amazing Star Wars birthday cake! I bet he absolutely loved it.
Pingback: 16 Star Wars Recipes - May the 4th Be With You - My 3 Little Kittens